A command-line wrapper for diagrams and gloss so we can leverage them outside haskell.
The goal is to provide a good subset of features from both libraries.
See mindra-clj for an example of a client library. It talks to mindra via stdin/stdout using just formatted text.
Current status
Diagrams
Only the SVG backend is supported, and only a very small subset of diagrams is exposed. See svg-parser for what is supported and how the commands are parsed into diagram(s).
Most of the gloss features are supported. We should be able to use mindra for creating both static pictures and animations (with event handling!). See gloss-parser for what is supported and how the commands are parsed into gloss picture(s).
No pre-built binaries available at this time. We will need to build from source using stack install or cabal install.
Install stack, clone this repository and run the following in repository directory.
stack install
Basic usage
A. Start mindra command
mindra
It should print READY INIT which means it is ready to receive the INIT (initialization) command.
B. Initialize it for either diagrams or gloss
For diagrams
Configure for SVG of size 300px by 400px:
INIT Diagrams SVG 300 400
Note: Each command should be followed by a blank line.
For gloss
Configure for a window of size 500px by 500px, at position 10px, 10px on the screen, with the title “My Title”, and white background color (red, green, blue, alpha values):
INIT Gloss
Window 500 500 10 10 "My Title"
Color 255 255 255 255
Note: Each command should be followed by a blank line.
C. Draw something
For diagrams
SVG Circle 100
For gloss
PICTURE Circle 100
Note: Each command should be followed by a blank line.
Due to limited licensed bands and the ever increasing traffic demands, the mobile communication industry is striving for offloading licensed bands traffic to unlicensed bands. A lot of challenges come along with the operation of LTE in unlicensed bands while co-locating with legacy Wi-Fi operation in unlicensed band. In this co-existing environment, it is imperative to identify the technologies so that an intelligent decision can be made for maintaining quality of service (QoS) requirement of users.
Next to this unlicensed co-existing environment, a second concern is the sharing of the licensed bands where DVB-T operates. This is called white space reuse. The reuse factor used in DVB-T systems leads to unused spectrum at a given location. Users can opt to use this spectrum if and only if no DVB-T transmission is present and they transmit using less power than TV broadcast stations. It is thus necessary to periodically sense if the spectrum is unused by the primary user or other secondary users. On the other hand the primary user, the TV broadcast stations, will want to detect if there is illegal use of their licensed spectrum at the time they want to use it.
Manual feature extraction vs autonomous feature learning
Wireless technology identification can be implemented in multiple ways. We decided to use machine learning techniques, given many recent breakthroughs and success in other domains. Furthermore, it allows learning identifying wireless technologies on its own by giving it data. How we captured this data is described in the next section.
We consider two techniques for machine learning: one where we manually extract features using export knowledge and one where we give raw RSSI data to the machine learning model. The second technique exploits the autonomous feature learning capabilities of neural networks.
We manually extracted the following features:
r0,r1,…,r19 are 20 intervals selected from the input histogram. r0 corresponds with the most left part of the histogram with frequency > 0, while r19 represents the most right part of the histogram with frequency > 0. Each interval thus contains 5% of the histogram and its value resembles the frequency of RSSI values within the corresponding interval.
minR is the minimum RSSI value with frequency > 0 and thus the left boundary of the histogram.
maxR is the maximum RSSI value with frequency > 0 and thus the right boundary of the histogram.
nP is the measured amount of peaks in the histogram.
wP is the width of the highest peak.
stdHist is the standard deviation of the histogram values.
stdData is the standard deviation of the RSSI values upon which the histogram is calculated.
meanData is the mean of the RSSI values upon which the histogram is calculated.
medianData is the median of the RSSI values upon which the histogram is calculated.
Manually feature extraction allows faster signal classification, but requires expert knowledge. The autonomous feature learning model is more flexible because it adapts to new situations given enough useful data. Using complex DNN models also allows slightly higher accuracy (98%) than manual feature selection methods (97%).
Dataset description
We used two datasets that are part of the eWINE project.
The first dataset, used for training, was captured at various locations in Ghent, Belgium. The dataset can be found here.
A second dataset, used for validation, was captured at Dublin, Ireland. The dataset can be found here.
Model description
The models for both manual and automatic feature extraction are present in manual feature extraction/rssilearningmanual.m and automatic feature learning/neuralnetworkautomatic.m respectively. Manual feature extraction uses the features as described before as input, while automatic feature extraction uses 256 RSSI values which are derived from 16 IQ samples per RSSI value. The neural network architecture of the manual model can be seen below.
This is the open source code for the old version of OutSystems Now.
This version of OutSystems Now, brings your OutSystems experience to your mobile device, providing a fast way to access all your applications, including CRM, Customer Portal, or any other custom app built with the OutSystems Platform.
Note that this is a deprecated version of OutSystems Now and is no longer supported by OutSystems. You can find more details on the OutSystems Now website.
The source code is made available for you to create your own version of the application.
This way you can apply your own branding, such as the application name, logo and splash screens.
You can also have control over push notifications and enhance your business with a true mobile experience
Requirements
You will need a Windows development environment such as Visual Studio 2013 and a Windows Store Developer account. You can submit the application to Windows Store if it complies with the store guidelines. The newly created application will be under your responsibility and should be supported by you.
Steps for building your own customized OutSystems Now
1. Get the source code
You can clone (or fork) the repository or just download it as a zip file to have a local copy.
2. Setup your development environment
If you have not already have the development environment, download and install Microsoft Visual Studio in your computer.
Open the CordovaApp.sln solution file (in the folder platforms\windows).
3. Customize your OutSystems Now
Open the GitHub source code in your development environment and you are ready to start building your own version of the application.
To learn more about the Windows development you can check out Windows Universal Apps guide.
Change the application name
Submitting your own Windows App to the Windows Store means that you need to reserve your app name first. This action will ensure that no one else uses the name. Learn how you can reserve your app name. After reserving you app name you need to change the display name. To change the display name of your app, follow the next instructions:
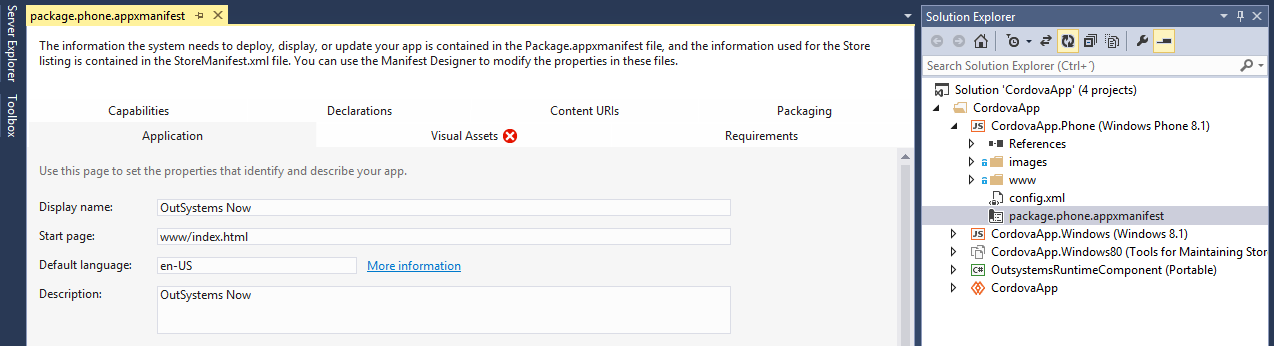
In the Solution Explorer, double-click on the appxmanifest file of CordovaApp.Phone project
Select the Application tab
Change the Display name
Repeat these steps for the CordovaApp.Windows project
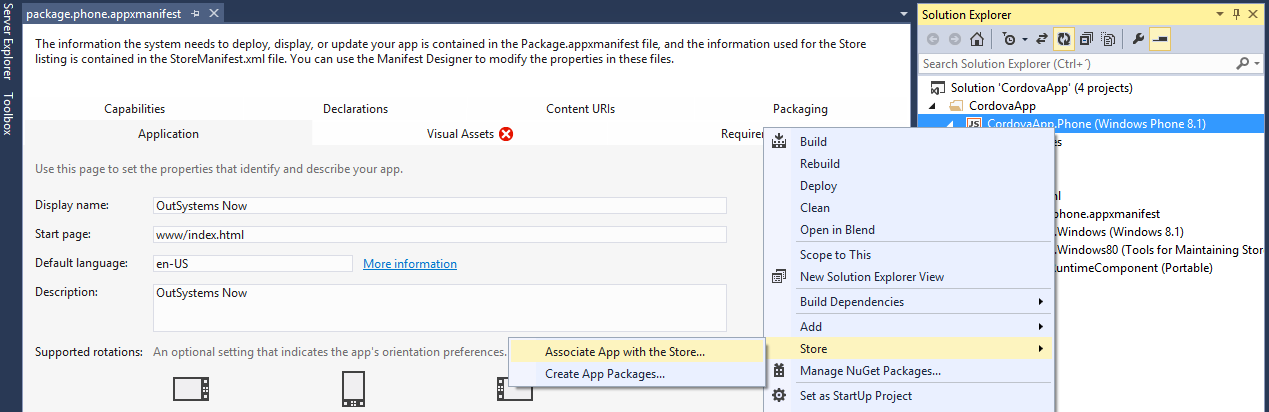
Now that you have changed the display name of your app, you need to associate your app with the app name that you initially reserved for Windows Store submission. To associate your app with the Store,follow the next instructions:
In the Solution Explorer, right-click on the CordovaApp.Phone project
Select Store
Click on Associate App with the Store
Sign in to the Windows Phone Store
Select the App Name for your app
Associate your app
Repeat these steps for the CordovaApp.Windows project
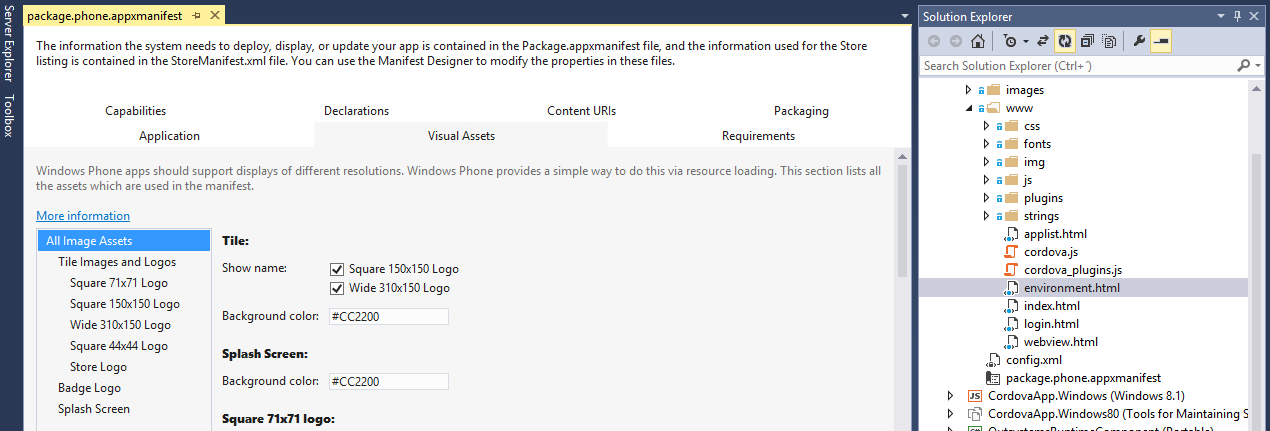
Replace the application logo and splash screens
In your Visual Studio project you can find all images related with the application logo and splash screen on the Visual Assets tab of the appxmanifest file of your CordovaApp projects. You will need several different image sizes due to the multitude of devices. You can find that images under the images folder (platforms > windows > images).
You will also want to customize the OutSystems logo image that appears on the first screen, where the user types the environment address. You can find that image (logo_original.png) under the img folder (platforms > windows > www > img). Replace it with an image with the same dimensions (530×80) and a transparent background. If you need help creating icons and splash screen, there are several websites, such as TiCons, that can help you generate all the necessary files.
Enable Push Notification on your application
To push notifications we suggest that you use a third-party service such as Pushwoosh or UrbanShip (paid services). These services simplify the whole process of pushing notifications and, better yet, they provide a single way of doing it for iOS, Android and Windows. No need to develop custom push mechanisms for each vendor. There are several other companies offering the same services and you can work with any of those if you wish. Most of them are paid services, so a subscription fee may be necessary.
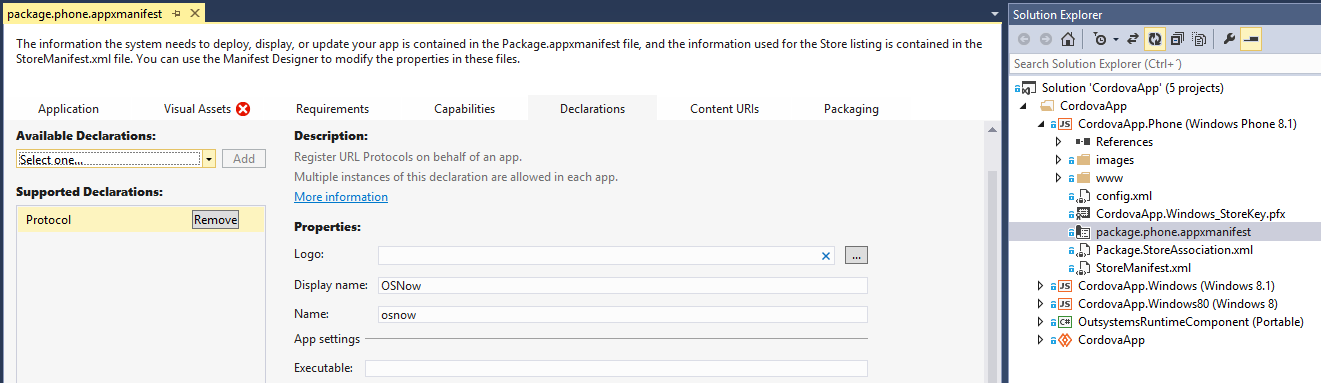
To enable the deep linking feature on your own application you need to change the Application Protocol. Open the AppManifest file of the Windows Phone project and select the Declarations tab. Find the Protocol declaration and change both the Display Name and Name. Repeat these steps for the AppManifest file of the Windows 8.1 project.
4. Publish to the store
Once you have your own version of the OutSystems Now application, you can distribute it. Learn how you can do it with the Publish Windows apps and games guide for Windows.
- React fber is ongoing reimplemntation of Reacts core algorithm
Incremental Rendering : Ability to split the rendering work into chunks and spread out over multiple frames (React makes application faster)
On the UI we have a DOM
Suppose we have 7 restaurant cards
After filtering our Ui changes to 3 restaurant cards
-When we have 7 restaurants cards at beginning , react creates a Virtual DOM (Represntation of an Actual DOM ) –> Javascript Object (React Virtual Dom)
Diff Algorithm
Findss the differnce bewtween two Virtual DOMS (old Virtual dom and new virtual dom)
- *ReactFiber* It will calculate the Differnce between the objects when any event happens and calculate the result and update the DOM at every render cycle
UseEffect Hook();
impoert {useEffect} from “react”;
useEffect will take two arguments
1st Arrow function( Call back function)
2nd Dependency Array
When will useEffect call back function called?
this call backfunction is called After our component renders
If we want something to be called after our page renders we use UseEffect
Can we call swiggy api in our project ?
when we fect the swiggy api , we are getting error
Access to fetch at API’ from origin ‘http://localhost:1234‘ has been blocked by CORS policy
What is CORS policy ? Who is blocking us ?
Our browsers block us from calling API from one origin to other origin
How to bypass this cors ploicy error – Use CORS chrome exteniosn
SHIMMER UI –> FOR BETTER UX
Shimmer UI is a technique for displaying loading states in web and mobile apps. It provides a FAKE PAGE the appearance of content that will eventually load, improving the user experience by providing visual feedback and reducing perceived wait times
We make user psychologocly better
when we load a page , we see a blank cards and eventually they will filled with data
State Updater Function or State setter in React
const [btn, setbtn] = useState(‘Click me’);
btn: This is the state variable that holds the current state value.
setbtn: This is the state updater function. You call this function to update the state value of btn. When you call setbtn, React will re-render the whole component again with the new state value.
Do you know?
Many developers have doubt that How const state variable is updated , when it is constant?
Answer : When we are using state setter it is re rendering the whole component , so the old const variable is not same , as it is totally rerendered it is actg like new variable , so it will update the value adn refernce and will re render
Whenever we change the local state variable, react will rerender the component 📌
STATE REACT VARIABLE – When ever state Variable update, react triggers a recoinciliation cycle ( re-renders the component) –> React has such amazing best algorithmsm to do this
and it will updatge only the portion required
Never Use anchor tag in react to navgiate through pages , beacuase anchor tag will rerender the whole page again when navigated
REDUX TOOL KIT
Install @reduxjs/toolkit and react-redux
Build our Redux store
Connect our store to our App (React and redux bridge)
Easy to use health check for your FastAPI. This is the root module that will let you add implement and expand your usage of health checks, with FastAPI.
This module does not contain any service checkers, but you can easily add them. The other modules are not in this root module due to different dependencies required for each one. This is made so you only bring in the packages that you need to not add extra packages.
Install
pip install fastapi-healthcheck or poetry add fastapi-healthcheck
Adding Health Checks
Here is what you need to get started.
fromfastapiimportFastAPIfromfastapi_healthcheckimportHealthCheckFactory, healthCheckRoutefromfastapi_healthcheck_sqlalchemyimportHealthCheckSQLAlchemyapp=FastAPI()
# Add Health Checks_healthChecks=HealthCheckFactory()
# SQLAlchemy comes from fastapi-healthcheck-sqlalchemy_healthChecks.add(HealthCheckSQLAlchemy(alias='postgres db', connectionUri=cs.value, table=SmtpContactsSqlModel, tags=('postgres', 'db', 'sql01')))
# This will check external URI and validate the response that is returned.# fastapi-healthcheck-uri_healthChecks.add(HealthCheckUri(alias='reddit', connectionUri="https://www.reddit.com/r/aww.json", tags=('external', 'reddit', 'aww')))
app.add_api_route('/health', endpoint=healthCheckRoute(factory=_healthChecks))
Returned Data
When you request your health check, it will go and check all the entries that have been submitted and run a basic query against them. If they come back as expected, then a status code is 200. But if it runs into an error, it will return a 500 error.
If you have made a public service module and want to see it on this list, please open a new issue so we can add it to the list.
Writing a custom module
You can easily expand on this core module to add other health checks for other services. Generate a new service that pulls in HealthCheckInterface and HealthCheckBase. With those, you can build the respective class around the interface.
Once you have your service ready to go, add it to the HealthCheckFactory, and let the testing start.
If you would like to see an example of a custom service see fastapi_healthcheck_sqlalchemy. This will give you a better example of what you need to do to create your own module to interface with healthcheck.
The Forms package lets you generate forms as well as fields with standard make commands. Inside your forms for models you can specify the fields that need to be generated and then simply pass the form to the view. No more writing html forms, error handling etc. It can handle Eloquent relationships and easily work with ajax requests for more dynamic form submissions.
Forms is open-sourced software licensed under the MIT license
Bug Reporting and Feature Requests
Please add as many details as possible regarding submission of issues and feature requests
Disclaimer
THE SOFTWARE IS PROVIDED “AS IS”, WITHOUT WARRANTY OF ANY KIND, EXPRESS OR IMPLIED, INCLUDING BUT NOT LIMITED TO THE WARRANTIES OF MERCHANTABILITY, FITNESS FOR A PARTICULAR PURPOSE AND NONINFRINGEMENT. IN NO EVENT SHALL THE AUTHORS OR COPYRIGHT HOLDERS BE LIABLE FOR ANY CLAIM, DAMAGES OR OTHER LIABILITY, WHETHER IN AN ACTION OF CONTRACT, TORT OR OTHERWISE, ARISING FROM, OUT OF OR IN CONNECTION WITH THE SOFTWARE OR THE USE OR OTHER DEALINGS IN THE SOFTWARE.
The theme is based on Bootstrap3. And it is built with HTML5, CSS and jQuery with proper use of google rich-snippets markup.
Layout
Boxed
Full Width
Changes
Colours better, but we need the nav link text not to be orange -just white, hover pale blue
Can we the links be made up of a smaller dark blue box inside the nav (like the reference site)
The mini logo isn’t working as it’s tiny. It should be text (eg Choose a currency…) until you scroll down, and when nav becomes sticky we replace that text with the mini logo (but much bigger than you have it right now.
The posted by text at the top of the article wants to be viewed by user as continuous text eg. “Posted by John Cameron on February 17, 2017 in AUD, GBP, GBP to AUD.” but in code each will be inside schema.
Can you make the related posts at bottom exactly the same format at the ones on the side column?
The rates scroller at bottom needs to be width of container not full-width. Also it doesn’t scroll anymore?
#Final Changes
The side image banners, are they the same size as the Torfx ad on the Future Currency website? Reason being, I want the side column width to be same as the ads.
the related posts at bottom, there will be no image as the text is taking up too much space. Any ideas?
can we lose the icon/bottom border under the side bar headings (eg Exchange Rate Calc) and can the margins be so that the headings start further to the left so the text lines up with the text underneath?
RSSBud can help you quickly discover and subscribe to RSS feeds from websites or apps, especially those provided by RSSHub. It supports the parameters feature of RSSHub which facilitates extra functionalities such as filtering by feed content and full text fetching.
Detects RSSHub feeds applicable for web pages (supports almost all rules of RSSHub Radar)
Detects other RSS feeds applicable for web pages (powered by RSSBud Rules)
Optimized for mobile environment (automatically expands URLs and adapts to common mobile sub-domains)
Share sheet extension
Quick subscription to Reeder, Fiery Feeds, Ego Reader, and system default RSS reader
Quick subscription to Tiny Tiny RSS, Miniflux, Fresh RSS, Feedly, Inoreader, Feedbin, The Old Reader, Feeds Pub
Parameter editor for RSSHub feeds
Rules kept up-to-date automatically
Customizable remote rules files
Simultaneously matches against multiple rules files
RSSHub access control (automatically generates MD5 access code)
Supports x-callback-url; can be used in “Shortcuts” app to facilitate a variety of powerful functions (see Shortcut Workshop and Scheme)
Shortcut Workshop
If RSSBud doesn’t support your RSS reader/service, or you want to integrate RSSBud into your workflow, you can write shortcuts utilizing RSSBud’s support for x-callback-url to fulfill your needs. Let’s start with the following ones!
RSSBud Starter Shortcut by cayZ | A template for RSSBud related shortcuts that sets up the variables and supports share sheets.
If you think you’ve got an idea of a shortcut that can benefit a larger audience, you’re welcomed to submit an issue!
X-callback-url Scheme
RSSBud has implemented the x-callback-url protocol, which provides a standardized means for iOS developers to expose and document the methods they make available to other apps via custom URL schemes.
You can open the following URL to let RSSBud analyze the provided URL and return the RSS feed chosen by the user:
feed_title The name of the RSS feed chosen by the user
feed_url The URL of the RSS feed chosen by the user
PopClip Extension
If you happen use both RSSBud and PopClip on macOS, here’s a handy extension that can be used to analyze selected URLs with RSSBud. Simply select everything in the code block below and you will see an option to install the extension in PopClip.
The core functionality of RSSBud comes from RSSBud Core, a sub-project written in JavaScript. The code is mainly referenced from RSSHub Radar.
Make sure you have Node.js installed before you build with Xcode.
If you wish to use the action extension, please set up your own App Group in both the iOS and Action Extension targets and modify RSSBud.appGroupIdentifier accordingly.
Rules
RSSBud’s functionality is largely powered by rules from two open-source projects. Please consider contributing to the appropriate rules if a particular feed can’t be discovered by RSSBud.
RSSHub Radar Rules are created and maintained by the RSSHub community. They are used to discover RSSHub feeds.
RSSBud Rules are a superset of RSSHub Radar rules. The extended schema allows non-RSSHub feeds (e.g. official RSS feeds that are not discoverable by parsing HTML) to be discovered. Please consider contributing to RSSHub Radar rules first if the feed is an RSSHub feed.
This repository contains my personal solutions to LeetCode problems, written in Java, JavaScript, SQL, and pandas.
All solution files are kept directly in the root of the repository. Each file is named after the problem it solves, often including the problem number and a descriptive title.


-12+-blue)


-12+-blue)


